
作者:E4b9a6, 创建:2023-11-23, 字数:14386, 已阅:131, 最后更新:2023-11-24
Linux下经常需要查看系统资源或硬件资源,与之对应的命令行也是非常多
本文将根据使用经验,将常见的查询方法总结罗列一遍以供参考
以下指令以Ubuntu1804、Cent7OS作为测试平台
uname -r命令输出发行版与内核信息,大部分发行版基本均带有此命令,但输出中未必包含发行版全称信息
Cent7OS
[chancel@localhost ~]$ uname -a
Linux localhost.localdomain 3.10.0-1160.62.1.el7.x86_64 #1 SMP Tue Apr 5 16:57:59 UTC 2022 x86_64 x86_64 x86_64 GNU/Linux
Ubuntu1804
➜  ~ uname -a
Linux ubuntu1804 4.15.0-189-generic #200-Ubuntu SMP Wed Jun 22 19:53:37 UTC 2022 x86_64 x86_64 x86_64 GNU/Linux
cat /proc/version命令输出内核版本与编译的gcc版本
Cent7OS
[chancel@localhost ~]$ cat /proc/version
Linux version 3.10.0-1160.62.1.el7.x86_64 (mockbuild@kbuilder.bsys.centos.org) (gcc version 4.8.5 20150623 (Red Hat 4.8.5-44) (GCC) ) #1 SMP Tue Apr 5 16:57:59 UTC 2022
Ubuntu1804
➜  ~ cat /proc/version
Linux version 4.15.0-189-generic (buildd@lcy02-amd64-039) (gcc version 7.5.0 (Ubuntu 7.5.0-3ubuntu1~18.04)) #200-Ubuntu SMP Wed Jun 22 19:53:37 UTC 2022
lsb_release -a命令输出发行版信息,但Cent7OS并不包含此命令
➜  ~ lsb_release -a
No LSB modules are available.
Distributor ID: Ubuntudescription:    Ubuntu 18.04.6 LTS
Release:        18.04
Codename:       bionic
cat /etc/redhat-release命令是Redhat系列独有的
[chancel@localhost ~]$ cat /etc/redhat-release
CentOS Linux release 7.9.2009 (Core)
cat /etc/*release命令在大部分Linux发行版中都可以使用,是最方便使用的命令
以Cent7OS为例
[chancel@localhost ~]$ cat /etc/*release
CentOS Linux release 7.9.2009 (Core)
NAME="CentOS Linux"
VERSION="7 (Core)"
ID="centos"
ID_LIKE="rhel fedora"
VERSION_ID="7"
PRETTY_NAME="CentOS Linux 7 (Core)"
...
CentOS Linux release 7.9.2009 (Core)
CentOS Linux release 7.9.2009 (Core)
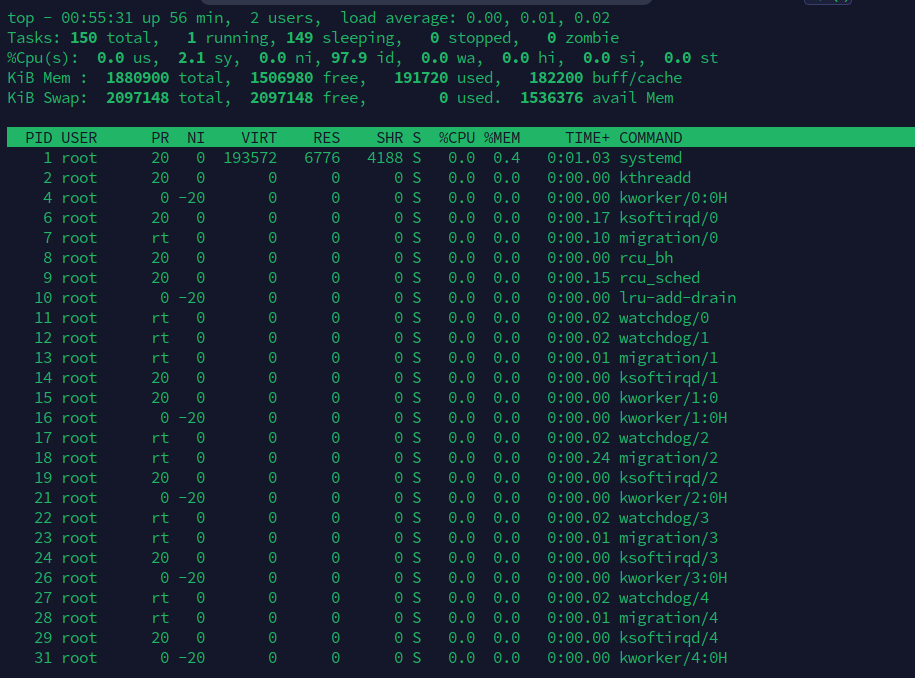
top指令是最常见用于检测CPU占用情况的指令,使用效果如下

此时按P以CPU占用排序,按M以内存占用排序,按I隐藏所有空闲进程,按S以运行时间排序
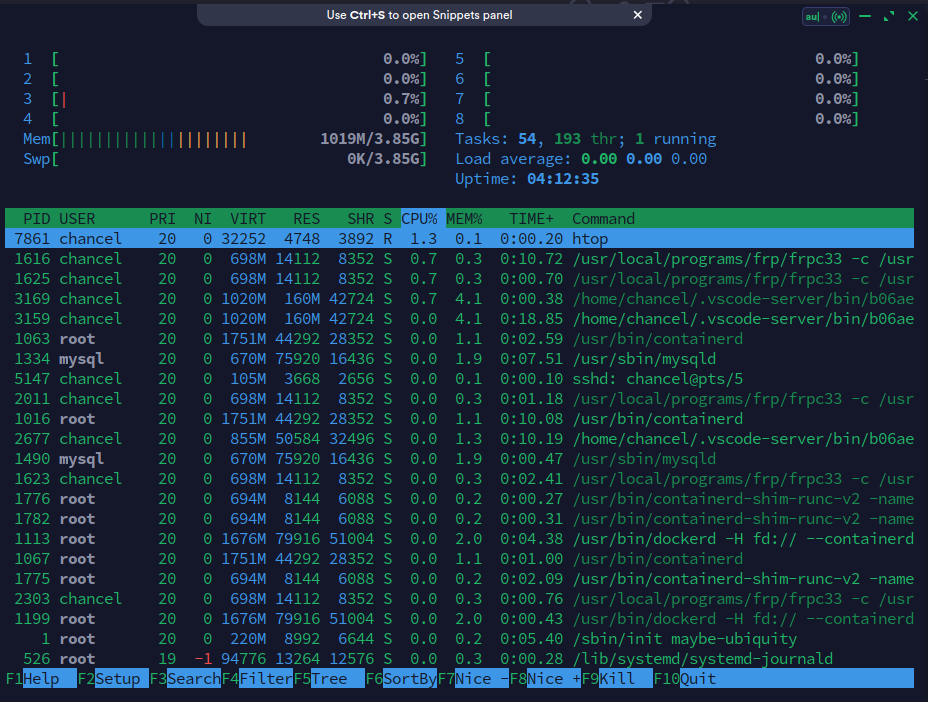
htop指令则是比top更简洁的显示程序,在部分发行版上需要自行安装,使用效果如下

相较于top的使用,htop界面更清晰易懂,使用方法在界面均有提示,对用户更为友好
通常情况下,htop需要自行安装
# Ubuntu
sudo apt install htop

# Cent
sudo yum install htop
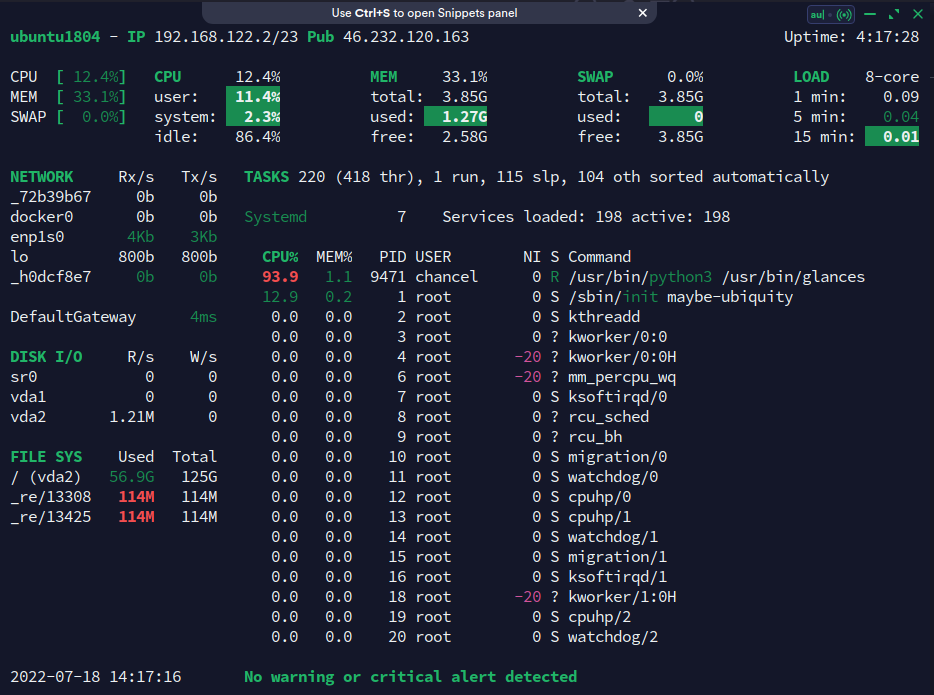
glances则是比htop更进一步的资源查看器
不但包括常见的CPU、内存,甚至还包括当前网速以及硬件温度数据,使用效果如下

通常情况下,glances需要自行安装,由于是使用Python语言开发的,所以资源占用也较大
# Ubuntu
sudo apt install glances

# Cent
sudo yum install glances
以上3个是我比较常用的系统资源占用查询工具,大部分情况下都非常够用
其他的可能还包括nmon、vmstat等,若有兴趣也可自行查询
df -h通常用于查询硬盘资源使用情况(-h代表使用以1024为单位且易读的方式显示)
➜  ~ df -h
Filesystem      Size  Used Avail Use% Mounted on
udev            1.9G     0  1.9G   0% /dev
tmpfs           395M  1.3M  394M   1% /run
/dev/vda2       126G   57G   63G  48% /
tmpfs           2.0G     0  2.0G   0% /dev/shm
tmpfs           5.0M     0  5.0M   0% /run/lock
tmpfs           2.0G     0  2.0G   0% /sys/fs/cgroup
/dev/loop0      114M  114M     0 100% /snap/core/13425
/dev/loop1      114M  114M     0 100% /snap/core/13308
tmpfs           395M     0  395M   0% /run/user/1000
fdisk -l则是用于查询物理分区情况
➜  ~ sudo fdisk -l
Disk /dev/loop0: 114 MiB, 119525376 bytes, 233448 sectors
Units: sectors of 1 * 512 = 512 bytes
Sector size (logical/physical): 512 bytes / 512 bytes
I/O size (minimum/optimal): 512 bytes / 512 bytes


Disk /dev/loop1: 113.9 MiB, 119418880 bytes, 233240 sectors
Units: sectors of 1 * 512 = 512 bytes
Sector size (logical/physical): 512 bytes / 512 bytes
I/O size (minimum/optimal): 512 bytes / 512 bytes


Disk /dev/vda: 128 GiB, 137438953472 bytes, 268435456 sectors
Units: sectors of 1 * 512 = 512 bytes
Sector size (logical/physical): 512 bytes / 512 bytes
I/O size (minimum/optimal): 512 bytes / 512 bytes
Disklabel type: gpt
Disk identifier: 376C8DD5-F786-4C39-9F4E-1461BE1FA269

Device     Start       End   Sectors  Size Type
/dev/vda1   2048      4095      2048    1M BIOS boot
/dev/vda2   4096 268433407 268429312  128G Linux filesystem
当然,fdisk命令本身主要还是用于管理硬盘分区,其管理过程是对话式的,类似于下
[chancel@localhost ~]$ sudo fdisk /dev/vda
[sudo] password for chancel:
Welcome to fdisk (util-linux 2.23.2).

Changes will remain in memory only, until you decide to write them.
Be careful before using the write command.


Command (m for help):
输入m可获得指令帮助,创建过程非常简单易懂
mkfs.[format]命令用于格式化硬盘,[format]代表硬盘格式,常见的格式如下
在分区成功后,通常需要格式化,使用mkfs.[format] /dev/[device_name]进行格式化
ip是常用的网络信息查看工具,是后期Linux用于替换ipconfig的工具
常见的用法
ip addr show显示网路ip信息(缩写ip a)ip link show显示网络接口信息(缩写ip l)ip route list显示网路路由信息(缩写ip r)ip neigh show显示网路ARP表信息(缩写ip n)ip addr通常用于设置网卡的网络信息,如
ip addr {add|change|del} 172.16.0.1/24 dev eth0添加/更改/删除网卡ipip link通常用于控制网卡的行为,如
ip link set eth0 {up/down}用于开启关闭网卡ip link set eth0 promisc {on/off}用于设置网卡混杂模式开启关闭ip route通常用于设置路由信息,如
ip route {add/del} [ip_address] via [gateway]添加/删除网关静态路由ip route {add/del} [ip_address] dev [interface]添加/删除接口静态路由ip neigh通常用于王路平arp表(替换老旧的arp命令),如
ip neigh {add/dev} [ip_address] dev [interface]添加/删除一个arp映射比较常用的是ip addr与ip route2个参数
前者用于查询网络ip信息,其输出如下
~ ➤ ip a
1: lo: <LOOPBACK,UP,LOWER_UP> mtu 65536 qdisc noqueue state UNKNOWN group default qlen 1000
    link/loopback 00:00:00:00:00:00 brd 00:00:00:00:00:00
    inet 127.0.0.1/8 scope host lo
       valid_lft forever preferred_lft forever
    inet6 ::1/128 scope host
       valid_lft forever preferred_lft forever
2: eth0: <BROADCAST,MULTICAST,UP,LOWER_UP> mtu 1500 qdisc fq_codel state UP group default qlen 1000
    link/ether 00:16:de:23:94:48 brd ff:ff:ff:ff:ff:ff
    inet 209.141.42.231/24 brd 209.141.42.255 scope global dynamic eth0
       valid_lft 2591984sec preferred_lft 2591984sec
    inet6 fe80::216:deff:fe23:9448/64 scope link
       valid_lft forever preferred_lft forever
后者常用于规划路由请求,如下
# 设置路由走网关172.16.0.1,得到公网IP为4.4.4.4
➜  ~ ip route add 104.160.18.230 via 172.16.0.1
➜  ~ curl https://api.chancel.me/rest/api/v1/ip
{"status":1,"msg":"Query success","data":{"ip":"4.4.4.4"}}

# 设置路由走网关192.168.1.1,得到公网IP为6.6.6.6
➜  ~ ip route del 104.160.18.230 via 192.168.1.1
➜  ~ curl https://api.chancel.me/rest/api/v1/ip
{"status":1,"msg":"Query success","data":{"ip":"6.6.6.6"}}
lscpu和cat /proc/cpuinfo都可以输出CPU信息,如下
➜  ~ lscpu
Architecture:            x86_64
  CPU op-mode(s):        32-bit, 64-bit
  Address sizes:         48 bits physical, 48 bits virtual
  ...
Vulnerabilities:
  ...
  Tsx async abort:       Not affected
lsmem和cat /proc/meminfo都可以输出内存信息,如下
➜  ~ lsmem
RANGE                                 SIZE  STATE REMOVABLE  BLOCK
0x0000000000000000-0x00000000bfffffff   3G online       yes   0-23
0x0000000100000000-0x0000000f3fffffff  57G online       yes 32-487

Memory block size:       128M
Total online memory:      60G
Total offline memory:      0B
lsblk用于查看硬盘信息,如下
➜  ~ lsblk
NAME        MAJ:MIN RM   SIZE RO TYPE MOUNTPOINTS
loop0         7:0    0     4K  1 loop /var/lib/snapd/snap/bare/5
...
loop8         7:8    0    47M  1 loop /var/lib/snapd/snap/snapd/16292
sda           8:0    0 476.9G  0 disk
└─sda1        8:1    0 476.9G  0 part /mnt/SDA
nvme0n1     259:0    0 931.5G  0 disk
├─nvme0n1p1 259:1    0   300M  0 part /boot/efi
├─nvme0n1p2 259:2    0 866.5G  0 part /
└─nvme0n1p3 259:3    0  64.7G  0 part [SWAP]
lsusb用于查看USB接口信息,如下
➜  ~ lsusb -t
/:  Bus 04.Port 1: Dev 1, Class=root_hub, Driver=xhci_hcd/2p, 10000M
/:  Bus 03.Port 1: Dev 1, Class=root_hub, Driver=xhci_hcd/4p, 480M
    |__ Port 1: Dev 2, If 0, Class=Human Interface Device, Driver=usbhid, 12M
    |__ Port 1: Dev 2, If 1, Class=Human Interface Device, Driver=usbhid, 12M
    |__ Port 2: Dev 3, If 0, Class=Hub, Driver=hub/4p, 480M
        |__ Port 2: Dev 4, If 0, Class=Human Interface Device, Driver=usbhid, 12M
        |__ Port 2: Dev 4, If 1, Class=Human Interface Device, Driver=usbhid, 12M
        |__ Port 2: Dev 4, If 2, Class=Human Interface Device, Driver=usbhid, 12M
/:  Bus 02.Port 1: Dev 1, Class=root_hub, Driver=xhci_hcd/2p, 10000M
/:  Bus 01.Port 1: Dev 1, Class=root_hub, Driver=xhci_hcd/4p, 480M
lspci用于提取主板上所有的硬件信息,如下
➜  ~ lspci
00:00.0 Host bridge: Advanced Micro Devices, Inc. [AMD] Renoir/Cezanne Root Complex
00:00.2 IOMMU: Advanced Micro Devices, Inc. [AMD] Renoir/Cezanne IOMMU
...
03:00.6 Audio device: Advanced Micro Devices, Inc. [AMD] Family 17h/19h HD Audio Controller
04:00.0 SATA controller: Advanced Micro Devices, Inc. [AMD] FCH SATA Controller [AHCI mode] (rev 81)
如果需要更详细的pci信息,可以使用lspci -v或lspci -vv
lspci通常配合grep用于筛查硬件信息,如lspci | grep -i eth可查看网络接口情况
➜  ~ lspci | grep -i eth
02:00.0 Ethernet controller: Realtek Semiconductor Co., Ltd. RTL8111/8168/8411 PCI Express Gigabit Ethernet Controller (rev 15)
以下命令相较于上面的命令来说,能更加全面的显示系统资源与硬件信息
netstat用于监控tcp/ip连接信息,常用于查找某个端口的占用程序
如netstat -anp | grep 8384便可以查询出占用8384端口的程序PID
-a代表列出所有,-n代表禁用反向域名解析,-p代表打印程序PID
效果如下
➜  ~ netstat -atp | grep 8384
(Not all processes could be identified, non-owned process info
 will not be shown, you would have to be root to see it all.)
tcp        0      0 localhost:8384          0.0.0.0:*               LISTEN      817/syncthing
使用-l参数,可以显示所有正在监听端口的服务程序,如下
➜  ~ netstat -tnlp
(Not all processes could be identified, non-owned process info
 will not be shown, you would have to be root to see it all.)
Active Internet connections (only servers)
Proto Recv-Q Send-Q Local Address           Foreign Address         State       PID/Program name
tcp        0      0 127.0.0.1:8384          0.0.0.0:*               LISTEN      817/syncthing
...
tcp6       0      0 :::42103                :::*                    LISTEN      796/client_linux_am
注:
-p参数打印出PID,但ROOT用户运行的程序普通用户无法探查其PID,故看情况需要决定是否使用sudo
netstat也可打印网络接口信息,如下
➜  ~ netstat -ie
Kernel Interface table
enp2s0: flags=4163<UP,BROADCAST,RUNNING,MULTICAST>  mtu 1500
        inet 192.168.4.12  netmask 255.255.240.0  broadcast 192.168.15.255
        inet6 fd1c:b796:b00f:3f00:28a8:42ce:82e2:eda1  prefixlen 64  scopeid 0x0<global>
        inet6 fe80::fea6:9f63:51a6:3dc0  prefixlen 64  scopeid 0x20<link>
        inet6 240e:47c:630:64d9:b23c:f504:1008:88df  prefixlen 64  scopeid 0x0<global>
        ether 5a:bc:da:6d:f1:09  txqueuelen 1000  (Ethernet)
        RX packets 4480503  bytes 2392967850 (2.2 GiB)
        RX errors 0  dropped 1093  overruns 0  frame 0
        TX packets 2206930  bytes 246464482 (235.0 MiB)
        TX errors 0  dropped 0 overruns 0  carrier 0  collisions 0

lo: flags=73<UP,LOOPBACK,RUNNING>  mtu 65536
        inet 127.0.0.1  netmask 255.0.0.0
        inet6 ::1  prefixlen 128  scopeid 0x10<host>
        loop  txqueuelen 1000  (Local Loopback)
        RX packets 231260  bytes 482760756 (460.3 MiB)
        RX errors 0  dropped 0  overruns 0  frame 0
        TX packets 231260  bytes 482760756 (460.3 MiB)
        TX errors 0  dropped 0 overruns 0  carrier 0  collisions 0
netstat具备非常多的网络高级操作功能,若有兴趣,可参考man netstat进行学习
在Linux中,一切皆是文件
lsof(list open files)是一个列出当前操作系统打开文件的工具,所以lsof可以做到非常多的事情
直接使用lsof会显示当前系统所有正打开的文件,由于长时间运行的操作系统拥有多个进程,单纯使用lsof的操作较少
lsof常用于查询资源占用情况,如
lsof -c syncthing显示进程syncthing正在使用的资源lsof -c -p 817显示PID为817的进程正在使用的资源lsof +d /tmp显示正在使用/tmp目录的进程列表lsof -i :8384显示正在使用端口8384的进程lsof适用场景非常广泛,如
/mnt/sda target is busy,可以使用lsof /mnt/sda查看是什么进程正在占用目录lsof -i :8080查看是什么进程占用了端口8080lshw命令常用于输出机器配置摘要,如
lshw -html > my-hardware.html
除了html报告可选外,还有-json、-xml等格式可选
-short参数查看简略报告,如下
➜  ~ sudo lshw -short
H/W path              Device          Class       Description
=============================================================
                                      system      To Be Filled By O.E.M. (To Be Filled By O.E.M.)
/0                                    bus         X300M-STX
...
/0/4                                  system      Motherboard registers
/0/5                                  system      Motherboard registers
-class参数可指定查看部分硬件信息,如下
➜  ~ sudo lshw -class cpu -class disk
  *-cpu
       description: CPU
       product: AMD Ryzen 7 PRO 4750G with Radeon Graphics
       vendor: Advanced Micro Devices [AMD]
       ...
       sectorsize=512 wwid=eui.0025385211918242
  *-disk
       description: ATA Disk
       ...
       logicalsectorsize=512 sectorsize=512
inxi用于获取所有硬件与系统信息,如下
➜  ~ inxi
CPU: 8-core AMD Ryzen 7 PRO 4750G with Radeon Graphics (-MT MCP-)
speed/min/max: 1594/1400/4454 MHz Kernel: 5.19.0-1-MANJARO x86_64 Up: 6h 43m
Mem: 11918.5/60152.7 MiB (19.8%) Storage: 1.38 TiB (22.2% used) Procs: 416
Shell: Zsh inxi: 3.3.19
-M参数可用于获取机器硬件品牌信息
➜  ~ inxi -M
Machine:
  Type: Desktop Mobo: ASRock model: X300M-STX serial: <superuser required>
    UEFI: American Megatrends LLC. v: P1.70 date: 07/01/2021
获取单个硬件有以下参数
-CCPU信息-A声卡信息-N网卡信息-D硬盘信息-s传感器温度与风扇转速获取系统资源信息有以下参数
-p硬盘分区信息-I进程数以及开机时间等信息-t显示5个最占用CPU/内存的应用(使用cm10可修改成前10个)-n网络接口信息-r软件仓库信息同样inxi也支持输出机器配置报告
➜  ~ inxi -b
System:
  Host: KDE-Manjaro-64G Kernel: 5.19.0-1-MANJARO arch: x86_64 bits: 64
    ...
  Shell: Zsh inxi: 3.3.19
下面是比较全面的输出机器硬件与软件信息
➜  ~ inxi -Fza
System:
  Kernel: 5.19.0-1-MANJARO arch: x86_64 bits: 64 compiler: gcc v: 12.1.0
    parameters: BOOT_IMAGE=/boot/vmlinuz-5.19-x86_64
    root=UUID=2ddecb6a-da82-48f6-9f5a-d810b32d623b rw quiet apparmor=1
    security=apparmor resume=UUID=406e14e5-7ca3-4959-bb61-8bf9158da6f9
    udev.log_priority=3
  Desktop: KDE Plasma v: 5.24.6 tk: Qt v: 5.15.5 wm: kwin_x11 vt: 1
    dm: SDDM Distro: Manjaro Linux base: Arch Linux
Machine:
  Type: Desktop Mobo: ASRock model: X300M-STX serial: <superuser required>
    UEFI: American Megatrends LLC. v: P1.70 date: 07/01/2021
CPU:
  Info: model: AMD Ryzen 7 PRO 4750G with Radeon Graphics bits: 64
...
Info:
  Processes: 416 Uptime: 6h 52m wakeups: 0 Memory: 58.74 GiB
  used: 11.55 GiB (19.7%) Init: systemd v: 251 default: graphical
  tool: systemctl Compilers: gcc: 12.1.0 clang: 14.0.6 Packages: 1707
  pacman: 1701 lib: 372 flatpak: 0 snap: 6 Shell: Zsh v: 5.9
  running-in: konsole inxi: 3.3.19